Managing Switches with REST and Thrift APIs
Learn how to use APIs for networking in this excerpt from "Building Modern Networks."
December 26, 2017

APIs themselves predate modern networks and computing, but only became useful in networking around the year 2000 when REST was introduced. Since REST has been around longer than Thrift, we will discuss it first.
REST
REST, like other networking APIs, is available both on the local system and remotely. REST is designed to be:
Scalable: RESTful applications must be scalable by utilizing some or all of the following concepts:
Simplifying components: A simple component will scale better than a complex one; complex components should be broken down into multiple simpler ones
Decentralization: This could be done by distributing processing across multiple components
Frequency of operations: The more interactions that happen between the client and server, the more it impacts the performance of the application
High performance: There are a few different ways in which performance can be measured:
Network performance: The application must be adaptable to the style and size of the data it is carrying to not overburden the application
Perceived performance: The application must minimize latency by deciding whether to compress data on the fly, create latency on the server side, or stream all of the data that may cause latency on the client side
Modifiable/evolvable: The application must be evolvable, extensible, customizable, configurable, and reusable
Portable: The application must be portable and return both the information and the structure
Visible: The application must be visible to other applications
Reliable: The application must return data in the format expected as designed within the constraints of the REST design
Simple: By design, all REST implementations must use a uniform interface.
REST has six guiding constraints, all of which must be met for an application to be RESTful:
Client-server: The needs of the user application are separate from the server application. The server and client may store data as they see fit but must transmit data in the requested format.
Stateless: The application must be stateless as the server should not retain any client data from previous interactions with the same client.
Cacheable: The data must define whether it is cacheable or not and the amount of time it can be cached.
Layerable: You must be able to feed the application making the request from the server directly or any intermediary nodes that may have cached the required information without needing to be told so.
Code-on-demand: The server can optionally provide code, such as compiled JavaScript or other programs, to be utilized by the client to extend the functionality of the client.
Uniform interface: Once a developer becomes familiar with one of your APIs, they should be able to follow a similar approach for other APIs.
A uniform interface, as described by REST, must do the following:
Identification of resources: When sending data, the data must be portable and sent in the manner the client requests, if available
Manipulation of data by client: The client must have enough information to be able to modify or delete data
Self-descriptive: Each message must contain the information necessary to process the message, for example, which parser (JSON/XML/so on) to utilize
Hypermedia as the engine of the application state: A REST client after making a request to a URI should be able to utilize links provided by the server to discover the necessary information to fulfill its request
REST utilizes standard operations, such as:
PUT: Sends data to be programmed to the REST agent, replacing or modifying the current data
GET: Requests either a list of URIs or specific data necessary from an agent
POST: Creates a new entry in the dataset or within a dataset
DELETE: Deletes an entry in the dataset or within a dataset
In this book, we will focus on the SnapRoute RESTful API.
Apache Thrift
Apache Thrift (or Facebook Thrift as some refer to it) aims to provide scalable services across different programming languages. Thrift combines a generation engine for code with a software stack to create services that work effectively and efficiently between multiple programming languages, including:
C++: A high-level programming language that is feature-full and object-oriented
Python: A high-level general-purpose programming language
Java: A multi-architecture programming language that allows you to run the same program on multiple different types of computers
Ruby: An object-oriented language patterned after Perl and LISP
JavaScript: A remotely interpreted programming language mostly utilized by web servers and websites
The goal of Thrift was to create a simple interface that could work with any programming language; to this end, the following goals are defined:
Simple: The code should be simple, readable, and free of unnecessary dependencies
Consistent: Language-specific code is kept in extensions, not included in the core
Transparent: It should utilize as many commonalities between programming languages as possible
High performance: Performance is more important than beauty; the code should be functional but not always beautiful
In comparison to REST, Thrift has an Interface Definition Language (IDL), which is programming-language-independent and is publish-subscribe instead of client-server. The publish-subscribe method is the concept where the client subscribes to the server to get the data. The client may only receive some of the data published based on filtering. Neither the client nor the server knows who each other are; it just knows the type of data to expect.
In this book, we will focus on Thrift and how it interfaces with the Facebook Open Switch System (FBOSS).
NEXT Page: SnapRoute: A RESTful API programmable routing stack
SnapRoute is a newly formed company focused on providing an easily automated and functional routing platform. It was built by a group of engineers who had worked on Apple's network. Here we will dive into how an API programmable routing stack works.
As it uses a RESTful API, the commands sent to the switch are done using either POST, GET,OPTIONS, PATCH, or DELETE.
SnapRoute refers to ports on a switch as fpPortX, where X is the number of the front panel (fp) ports. If the port can be broken out (for example, 10 Gx4 for 40 G or 25 Gx4 for 100 G), then there will be a delineator fpPortXsY, where the port number is X and the breakout is referred to as Y. So fpPort1s1 would be the front panel port 1, which is the breakout link 1.
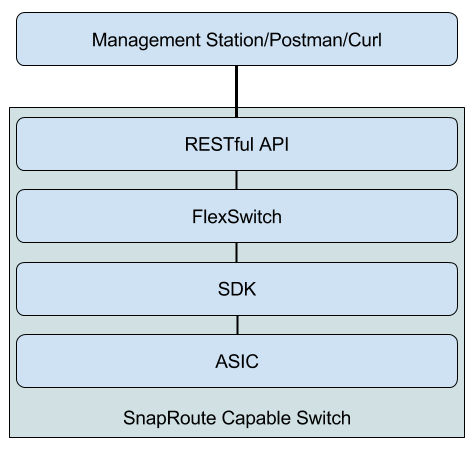
The following diagram shows the general software layout of a switch running SnapRoute's FlexSwitch. We have not included the operating system or any other programs or drivers necessary for the device to operate:

image.png
In order to send the output of commands to SnapRoute's FlexSwitch, use a Python module that formats JSON for better readability. If you don't use something to parse the data, the data will be somewhat readable but hard to understand. For example, if you want to see all the interfaces on the box, send this command:
curl -X GET --header 'Content-Type: application/json' --header 'Accept: application/json' 'http://localhost:8080/public/v1/config/Ports'
Without a parser, you will see something similar to the following output, which is very hard to decipher:
{"ObjectId":"6ec727d1-c2c8-44dc-77fd-d9b1fd6dce4c","Object":{"IntfRef":"fpPort1","IfIndex":145,"Name":"fpPort1","OperState":"DOWN","NumUpEvents":0,"LastUpEventTime":"","NumDownEvents":0}}
If we run the command again, using the Python-based json.tool parser, we get:
curl -X GET --header 'Content-Type: application/json' --header 'Accept: application/json' 'http://localhost:8080/public/v1/config/Ports' | python -m json.tool
{
"CurrentMarker": 0,
"MoreExist": false,
"NextMarker": 0,
"ObjCount": 160,
"Objects": [
{
"Object": {
"AdminState": "DOWN",
"Autoneg": "OFF",
"BreakOutMode": "1x100",
"Description": "",
"Duplex": "Full Duplex",
"EnableFEC": false,
"IfIndex": 145,
"IntfRef": "fpPort1",
"LoopbackMode": "",
"MacAddr": "00:90:fb:55:e5:11",
"MediaType": "Media Type",
"Mtu": 9412,
"PRBSPolynomial": "",
"PRBSRxEnable": false,
"PRBSTxEnable": false,
"PhyIntfType": "KR4",
"Speed": 100000
},
"ObjectId": "6ec727d1-c2c8-44dc-77fd-d9b1fd6dce4c"
},
{
"Object": {
"AdminState": "DOWN",
"Autoneg": "OFF",
"BreakOutMode": "1x100",
"Description": "",
"Duplex": "Full Duplex",
"EnableFEC": false,
"IfIndex": 140,
"IntfRef": "fpPort2",
"LoopbackMode": "",
"MacAddr": "00:90:fb:55:e5:11",
"MediaType": "Media Type",
"Mtu": 9412,
"PRBSPolynomial": "",
"PRBSRxEnable": false,
"PRBSTxEnable": false,
"PhyIntfType": "KR4",
"Speed": 100000
},
"ObjectId": "8029f48f-5b1b-492f-73b7-dc879e386508"
},
The preceding information is much clearer.
Taking it further, to get information about a specific port, say fpPort1, send:
curl -X GET --header 'Content-Type: application/json' --header 'Accept: application/json' -d '{"IntfRef":"fpPort1"}' 'http://localhost:8080/public/v1/config/Port' | python -m json.tool
{
"Object": {
"AdminState": "DOWN",
"Autoneg": "OFF",
"BreakOutMode": "1x100",
... duplicate content omitted (see above output)
"Speed": 100000
},
"ObjectId": "6ec727d1-c2c8-44dc-77fd-d9b1fd6dce4c"
}
Some of the pieces of information you receive are as follows:
The port speed is 100 Gbps
The port breakout mode is 1x100 Gbps (that is, it is not broken out)
In the preceding code, note that we are including the filter:
{"IntfRef":"fpPort1"}
This says we are referring to the interface with the name fpPort1 or front panel port 1.
To enable fpPort1, send:
curl -X PATCH --header 'Content-Type: application/json' --header 'Accept: application/json' -d '{"IntfRef":"fpPort1","AdminState":"UP"}' 'http://localhost:8080/public/v1/config/Port' | python -m json.tool
{
"Access-Control-Allow-Headers": "Origin, X-Requested-With, Content-Type,
Accept",
"Access-Control-Allow-Methods": "POST, GET, OPTIONS, PATCH, DELETE",
"Access-Control-Allow-Origin": "*",
"Access-Control-Max_age": "86400",
"ObjectId": "6ec727d1-c2c8-44dc-77fd-d9b1fd6dce4c",
"Result": "Success"
}
Refer to the following code:
{"IntfRef":"fpPort1","AdminState":"UP"}
This is the main piece of information; we are asking the system to turn front panel port 1 up.
This tells us that the call was successful:
"Result": "Success"
Now we can query the port again and see that it is now "AdminState": "UP":
curl -X GET --header 'Content-Type: application/json' --header 'Accept: application/json' -d '{"IntfRef":"fpPort1"}' 'http://localhost:8080/public/v1/config/Port' | python -m json.tool
{
"Object": {
"AdminState": "UP",
"Autoneg": "OFF",
"BreakOutMode": "1x100",
"Description": "",
"Duplex": "Full Duplex",
"EnableFEC": false,
"IfIndex": 145,
"IntfRef": "fpPort1",
"LoopbackMode": "",
"MacAddr": "00:90:fb:55:e5:11",
"MediaType": "Media Type",
"Mtu": 9412,
"PRBSPolynomial": "",
"PRBSRxEnable": false,
"PRBSTxEnable": false,
"PhyIntfType": "KR4",
"Speed": 100000
},
"ObjectId": "6ec727d1-c2c8-44dc-77fd-d9b1fd6dce4c"
}
NEXT Page: More configurations
To configure the speed of the port, you use the same command but substitute Speed with extra data:
Before:
curl -X GET "http://10.7.1.78:8080/public/v1/config/Port?IntfRef=fpPort2" | python -m json.tool
"Object": {
"AdminState": "DOWN",
"Autoneg": "OFF",
"BreakOutMode": "1x100",
"Description": "",
"Duplex": "Full Duplex",
"EnableFEC": false,
"IfIndex": 140,
"IntfRef": "fpPort2",
"LoopbackMode": "",
"MacAddr": "00:90:fb:55:e5:11",
"MediaType": "Media Type",
"Mtu": 9412,
"PRBSPolynomial": "",
"PRBSRxEnable": false,
"PRBSTxEnable": false,
"PhyIntfType": "KR4",
"Speed": 100000
},
"ObjectId": "8029f48f-5b1b-492f-73b7-dc879e386508"
}
In the preceding code, you can see that the speed is 100 Gbps or 100 GbE. Now refer to the following code:
curl -X PATCH --header 'Content-Type: application/json' --header 'Accept: application/json' -d '{"IntfRef":"fpPort2","Speed":40000}' 'http://localhost:8080/public/v1/config/Port'| python -m json.tool
"Access-Control-Allow-Headers": "Origin, X-Requested-With, Content-Type,
Accept",
"Access-Control-Allow-Methods": "POST, GET, OPTIONS, PATCH, DELETE",
"Access-Control-Allow-Origin": "*",
"Access-Control-Max_age": "86400",
"ObjectId": "8029f48f-5b1b-492f-73b7-dc879e386508",
"Result": "Success"
}
Here, we sent a command to change the speed to 40 Gbps or 40 GbE.
One thing to note is that integers do not have quotes ("") around them in the RESTful command, whereas strings do:
{"IntfRef":"fpPort2","Speed":40000}
To confirm the change, query the interface again:
curl -X GET "http://localhost:8080/public/v1/config/Port?IntfRef=fpPort2" | python -m json.tool
"Object": {
"AdminState": "DOWN",
"Autoneg": "OFF",
"BreakOutMode": "1x100",
"Description": "",
"Duplex": "Full Duplex",
"EnableFEC": false,
"IfIndex": 140,
"IntfRef": "fpPort2",
"LoopbackMode": "",
"MacAddr": "00:90:fb:55:e5:11",
"MediaType": "Media Type",
"Mtu": 9412,
"PRBSPolynomial": "",
"PRBSRxEnable": false,
"PRBSTxEnable": false,
"PhyIntfType": "KR4",
"Speed": 40000
},
"ObjectId": "8029f48f-5b1b-492f-73b7-dc879e386508"
}
In the Postman API development program, which we will discuss in depth in Chapter 5, Using Postman for REST API Calls, we can send the same commands via a graphical interface, which will return the same data as we saw via curl. For example, we send the following:
{GET} http://snaproute.router.ip:8080/public/v1/config/Ports

(Click on image for larger view)
We see the same output as we do with the curl command.
Configuring an interface
Using curl, you can easily configure an IP address on fpPort1:
curl -X POST --header 'Content-Type: application/json' --header 'Accept: application/json' -d '{"IntfRef":"fpPort1","IpAddr":"100.10.100.1/24"}' 'http://localhost:8080/public/v1/config/IPv4Intf'
{
"Access-Control-Allow-Headers": "Origin, X-Requested-With, Content-Type,
Accept",
"Access-Control-Allow-Methods": "POST, GET, OPTIONS, PATCH, DELETE",
"Access-Control-Allow-Origin": "*",
"Access-Control-Max_age": "86400",
"ObjectId": "a5856728-ab49-47b4-4ad4-de6a5e5a1ed3",
"Result":"Success"
}
To confirm that the interface was properly set up, you can confirm its functionality via ping:
# ping 100.10.100.2
PING 100.10.100.2 (100.10.100.2) 56(84) bytes of data.
64 bytes from 100.10.100.2: icmp_seq=1 ttl=64 time=0.432 ms
64 bytes from 100.10.100.2: icmp_seq=2 ttl=64 time=0.338 ms
You can also look at the ARP table:
curl -X GET --header 'Content-Type: application/json' 'http://localhost:8080/public/v1/state/ArpEntrys' | python -m json.tool
{
"CurrentMarker": 0,
"MoreExist": false,
"NextMarker": 0,
"ObjCount": 1,
"Objects": [
{
"Object": {
"ExpiryTimeLeft": "8m23.814811246s",
"Intf": "fpPort1",
"IpAddr": "100.10.100.2",
"MacAddr": "00:90:fb:59:3e:b7",
"Vlan": "Internal Vlan"
},
"ObjectId": ""
}
]
}
NEXT Page: Thrift
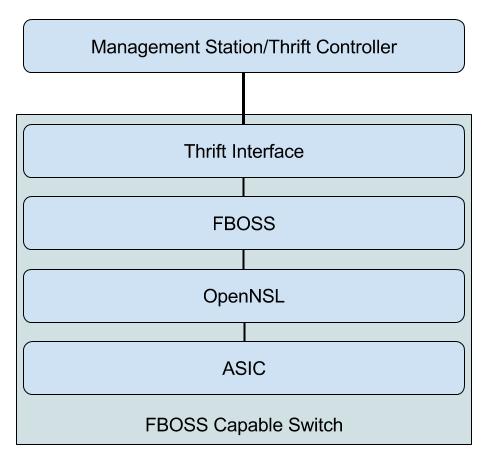
FBOSS is a Thrift API controlled forwarding agent from Facebook. In March of 2015, Facebook announced their first hardware switch, called the Wedge, and the network agent that ran on it, called FBOSS. On bringing up, FBOSS is configured statically. A Thrift-based API is used to add/modify/delete routes:

image 2.png
In the preceding diagram, you can see that an FBOSS switch is very similar to a FlexSwitch-enabled one and the one based on OpenFlow. In general, all switch network operating systems will have the same flow:
A configuration interface
A forwarding stack
SDK integration
FBOSS includes a Python script called fboss_route.py, which is used to configure the FBOSS agent directly. Our examples will use this:
fboss_route.py
usage: fboss_route.py [-h] [--port PORT] [--client CLIENT] [--host HOST]
{flush,add,delete,list_intf,list_routes,list_optics,list_ports,list_vlans,list_arps,list_ndps,enable_port,disable_port}
...
fboss_route.py: error: too few arguments
Here is the help information from the fboss_route.py script; you can see that you have options to:
Add/delete/flush route entries
List interfaces
List routes
List optics
List ports
List VLANs
List ARPs
List NDPs
Enable and disable ports
If we run the list_vlans command, we get the following:
# fboss_route.py list_vlans
===== Vlan 1000 ====
169.254.0.10
2001:00db:1111:1150:0000:0000:0000:000a
===== Vlan 1001 ====
172.31.1.1
===== Vlan 1002 ====
172.31.2.1
===== Vlan 1003 ====
172.31.3.1
===== Vlan 1004 ====
172.31.4.1
===== Vlan 1005 ====
172.31.5.1
===== Vlan 1006 ====
172.31.6.1
===== Vlan 3001 ====
10.11.0.111
2001:00db:3333:0e01:1000:0000:0000:00aa
===== Vlan 3002 ====
10.11.8.111
2001:00db:3334:0e01:1000:0000:0000:00aa
===== Vlan 3003 ====
10.11.16.111
2001:00db:3335:0e01:1000:0000:0000:00aa
===== Vlan 3004 ====
10.11.24.111
2001:00db:3336:0e01:1000:0000:0000:00aa
Running the list interface commands gives similar data, showing the L3 interface (VLAN) with the IP address you see in the preceding code:
# fboss_route.py list_intf
L3 Interface 1000: 169.254.0.10/16, 2001:db:1111:1150::a/64 (2e:60:0c:59:ab:4e)
L3 Interface 1001: 172.31.1.1/24 (2e:60:0c:59:ab:4e)
L3 Interface 1002: 172.31.2.1/24 (2e:60:0c:59:ab:4e)
L3 Interface 1003: 172.31.3.1/24 (2e:60:0c:59:ab:4e)
L3 Interface 1004: 172.31.4.1/24 (2e:60:0c:59:ab:4e)
L3 Interface 1005: 172.31.5.1/24 (2e:60:0c:59:ab:4e)
L3 Interface 1006: 172.31.6.1/24 (2e:60:0c:59:ab:4e)
L3 Interface 3001: 10.11.0.111/31, 2001:db:3333:e01:1000::aa/127 (2e:60:0c:59:ab:4e)
L3 Interface 3002: 10.11.8.111/31, 2001:db:3334:e01:1000::aa/127 (2e:60:0c:59:ab:4e)
L3 Interface 3003: 10.11.16.111/31, 2001:db:3335:e01:1000::aa/127 (2e:60:0c:59:ab:4e)
L3 Interface 3004: 10.11.24.111/31, 2001:db:3336:e01:1000::aa/127 (2e:60:0c:59:ab:4e)
If we list the ports, we can manipulate them:
# fboss_route.py list_ports
Port 1: [enabled=True, up=False, present=False]
Port 2: [enabled=True, up=False, present=False]
Port 3: [enabled=True, up=False, present=False]
Port 4: [enabled=True, up=False, present=False]
Port 5: [enabled=True, up=False, present=False]
To disable a port, simply send:
# fboss_route.py disable_port 1
Port 1 disabled
The system says port 1 is disabled; let's check:
# fboss_route.py list_ports
Port 1: [enabled=False, up=False, present=False]
Port 2: [enabled=True, up=False, present=False]
Port 3: [enabled=True, up=False, present=False]
Port 4: [enabled=True, up=False, present=False]
Port 5: [enabled=True, up=False, present=False]
If we want to add a route, we can do so using this:
# fboss_route.py list_routes
Route 10.11.0.110/31 --> 10.11.0.111
Route 10.11.8.110/31 --> 10.11.8.111
Route 10.11.16.110/31 --> 10.11.16.111
Route 10.11.24.110/31 --> 10.11.24.111
Route 169.254.0.0/16 --> 169.254.0.10
# fboss_route.py add 10.12.13.0/24 10.11.0.111
# fboss_route.py list_routes
Route 10.11.0.110/31 --> 10.11.0.111
Route 10.11.8.110/31 --> 10.11.8.111
Route 10.11.16.110/31 --> 10.11.16.111
Route 10.11.24.110/31 --> 10.11.24.111
Route 10.12.13.0/24 --> 10.11.0.111
Route 169.254.0.0/16 --> 169.254.0.10
To remove the route, do the same with delete instead of add:
# fboss_route.py delete 10.12.13.0/24
# fboss_route.py list_routes
Route 10.11.0.110/31 --> 10.11.0.111
Route 10.11.8.110/31 --> 10.11.8.111
Route 10.11.16.110/31 --> 10.11.16.111
Route 10.11.24.110/31 --> 10.11.24.111
Route 169.254.0.0/16 --> 169.254.0.10
You can also use the fboss_route.py script remotely by sending a host command:
# fboss_route.py --host 10.6.100.231 add 10.12.13.0/24 10.11.0.1
This tutorial is a chapter excerpt from "Building Modern Networks" by Steven Noble. Through Packt's limited-time offer, buy it now for just $5, or get it as part of the Modern Networks eBook bundle for just $15.
About the Author
You May Also Like


