VMware NSX Manager Deployment Guide
In this excerpt from "Learning VMware NSX, Second Edition" see the steps involved in setting up the network virtualization software.
April 5, 2018

NSX Manager is an appliance and it can be downloaded online from VMware's website. The download is available in the OVA format and can be then deployed in your environment. Before discussing the deployment of NSX, let's go over some considerations for deploying NSX.
VMware recommends that NSX Manager be deployed on a separate management cluster that will be separate from the compute cluster where your software-defined networks will be deployed. This decouples the management plane from the compute plane and allows for higher availability of your management systems. The management cluster will also run the vCenter server and NSX controllers are deployed on the compute cluster. The controller cluster virtual machines should be deployed on the management network and should be able to reach the vCenter server and hypervisors. It is also important to recall that vCenter and NSX have a 1:1 relationship with one NSX Manager only connected to one vCenter.
It is important to also size the environment appropriately to allow for easy resource additions if needed. NSX Manager also does not have built-in HA functionality and relies on ESXi's HA and DRS features to avoid downtime and resource contention. A minimum of three nodes is recommended for a management cluster to run NSX Manager. The management cluster should also be completely separate from any IP addressing space that is chosen to run compute production instances (instances such as your web, database, and application footprints), thereby keeping the management and compute planes isolated.
Once the NSX Manager OVA file is downloaded, we will proceed to import it to our vSphere cluster as follows:
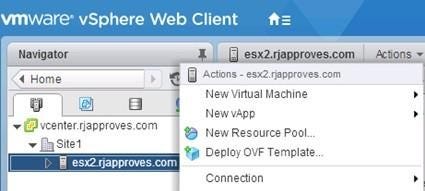
Get to the OVF deployment screen by clicking on Hypervisors and Clusters. Expand the vCenter, right-click the hypervisor, and select Deploy OVF Template...:

nsx-1.jpg
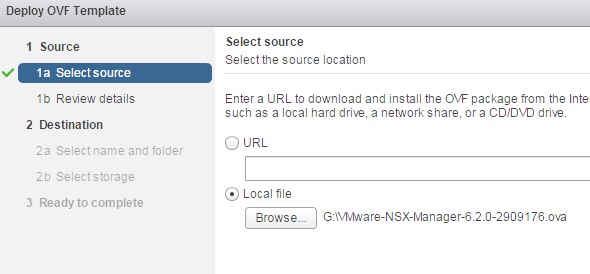
You will see the Deploy OVF Template screen

nsx-2.png
Select the OVF/OVA package that you have downloaded and click Next. You will see the details of the NSX OVA. Accept the extra configurations by clicking on the checkbox and click Next:

(Click on image for larger view)
Accept the EULA by clicking the Accept button and then click Next. Name your NSX Manager instance and select a datacenter or a folder you want it to be deployed to. Click Next to proceed to the next screen:

(Click on image for larger view)
Next, select the storage location and the appropriate policy. The default disk format is Thick Provision Lazy Zeroed, but I am going to deploy this appliance in a thin disk format to conserve space in my lab. The best practice is to deploy either Thick Provision Lazy Zeroed or Thick Provision Eager Zeroed:

(Click on image for larger view)
Select the network onto which this NSX Manager will be deployed. Typically this will be a management network where NSX Manager is able to talk to the vCenter it will connect to. Click Next:

(Click on image for larger view)
Next you will have to input all the values you'll configure this appliance with. This includes CLI admin and privileged mode passwords, IP address assignments, and DNS and NTP settings as well. There is an option to enable SSH mode; however, in production environments this is not a best practice unless you have taken appropriate measures to secure SSH access. Leaving the IP section blank will invoke a DHCP request to your DHCP server.
Click Next once you have completed all the values appropriately:

(Click on image for larger view)
Review the summary page and click Finish:

(Click on image for larger view)
You will now see your NSX Manager being deployed in the Tasks pane:

(Click on image for larger view)
This tutorial is an excerpt from "Learning VMware NSX -- Second Edition" by Ranjit Singh Thakurratan and published by Packt. Use the code ORNCB10 at checkout to get the ebook for just $10 until April 30.
About the Author
You May Also Like


