Data Center Design: Installing a Modern Network
In this excerpt from "Building Modern Networks," learn how to determine equipment requirements for a data center network.
May 8, 2018

In the previous chapter, you learned about RFI, PoC testing, and the support differences between open and proprietary network devices. In this chapter, we'll see how to design a next generation network. Before we dive into the details, first we'll introduce some new terms, then we'll move ahead with the topics.
By the end of this chapter you will able to do these:
Determine the size and state of the installation (new or additional)
Utilize the information from the RFI/PoC stage to determine the necessary equipment
Assemble a final list of equipment that is necessary to build an NGN
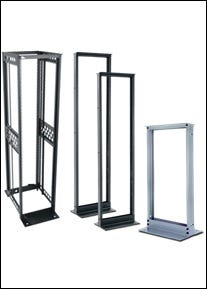
Equipment racks – two post, four post, and enclosed
Essentially, there are a few different types of rack that are used in data centers. Most often, you will see an enclosed four post rack (I don't think I've seen an enclosed two post rack), which is essentially a cabinet with mounting brackets and the width of the equipment is 19 inches (or 21 inches for OCP) and 28 inches or more deep. While you can have open four post racks, they are generally not used. Two post racks are racks where there is only one location to attach equipment and the equipment essentially floats outside the rack. In a two post rack, equipment can also be mounted in the center for more stability.

image 1-posts.jpg
Airflow
When looking at equipment, there are multiple ways the cooling fans can operate. In Front to Back (F2B), the fans take the air from the front and push it out through the back, like a standard computer. In Back to Front (B2F), the air is taken from the back and pushed out through the front. In side-to-side, the air comes in from one side and goes out the other.
In general, most equipment runs F2B; however, how you mount the equipment can change which airflow design you need. For example, a Cisco ISR router has all of the ports on the back, which means you should mount it backwards, with the Cisco bezel pointing inwards.
New versus old or greenfield versus brownfield
The concept of new versus old is very important to network design. You cannot properly design a network as an addition to an existing network without knowing all of the information about the old equipment including power use, heat, airflow, and weight.
Physical location
One of the most important parts of your design is based on whether the design is for a new location where the entire design is new or a current location where the design must fit together with other equipment. The deployment concept is called greenfield or brownfield, referring to a new site as green like new grass in a field and an old site as an old brown field.
When studying a new location, there are some pieces of information you will want to gather:
What are the dimensions of the room/cage where the NGN will be deployed? What is the furthest distance from the core of the network to the edge or ToR switches?
How is power distributed? Do you have access to 48V DC or just 120/240V AC? Are the power junction boxes coming from the ceiling or the floor?
What floor is the deployment on? What is the amount of weight per square foot/Kilo Pascals (kPa)—the metric equivalent, supported?
Do you have enough access to get the amount of fiber/copper into the room, accounting for physical firewalls in the ceiling?
Most, if not all, of this information should be known by the facilities manager. If there are questions about power, cooling, and so on, those may need to be referred to specialists. It is very important that all of the minimum specifications are met, otherwise when the equipment is installed there will be issues.
New location – greenfield
Since a greenfield network is much easier to deal with, we will start there. Once a site survey has been completed and the available power, cooling, space, and other important details are collected, the design can start.
Normally, the design will call out the specifications necessary for space and power and list the worst-case heat dissipation necessary. Some initial design concerns should be around airflow (F2B or B2F, never side-to-side), weight, and the type of rack (enclosed, four post, or two post).
Here, we utilize the RFI data about weight, size, and power usage to determine what the worst case scenario would be. We also need to plan for upgrades and additions. The good thing is that over time the power per byte goes down, so a basic rule is to take double what you need to build the initial setup, and make sure that the minimum specifications meet those demands.
Old location – brownfield
In a brownfield network, the same rules as a greenfield network apply except that you will be restricted to the power, cooling, and space available. Your design will encompass the current network, the upgrade path, and plans. Most networks are replaced in situ, where parts are replaced one by one or in groups and then swapped over. At the end of the chapter, there is a small section on moving from the old network to the new one.
Care must be taken to confirm that new and separate power has been pulled into the location for the new devices to derisk the installation. Cooling and floor weight capacity must be verified and confirmed so it meets or exceeds the worst case calculations for the new equipment.
In the event the equipment room was already designed to hold more equipment, you will want to verify that everything is correct and working. Often power will be reused by engineers to do what they need, without consideration for what the power is supposed to do.
If there is not enough power per rack for the design you are looking for, you may need to use more racks and limit the number of servers per rack, which will define how many ports you will use off the switches.
Using RFI/RFQ information to design the network
Now that we have the site survey information and the available power, cooling, and space, we can start designing and calculating what our needs are for the network. After the PoC, we will refer to the RFI, where we have physical specifications for each device. The data may also be available online, which is generally how we get data for open networking and white-box systems.
We will take the data from the PoC and RFI to determine the amount of equipment we will be using and the characteristics of the equipment. Remember, if you are using Direct Attach Cables (DACs) or fiber transceivers, we need to account for them.
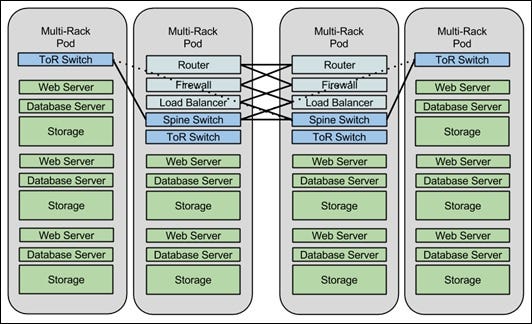
Design the network for expansion; you may need to add more cards to certain devices later, but those devices should have available slots for expansion. For example, if your design is two racks in a pod with two router/switches, two aggregation (ToR) switches, and a significant amount of compute/storage hardware, you will want to design for the addition of two more racks, where the two main routers/switches will become the spine of the network.
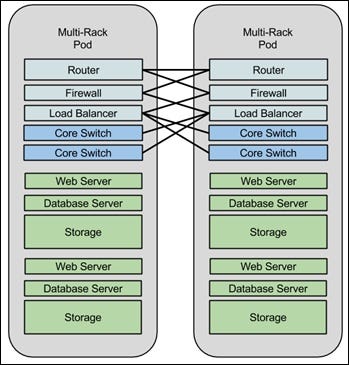
In the following diagram, we have two rack pods where there is a router, firewall, load balancer, and two core switches in each:

image 2-multi-rack pod.jpg
In this diagram, we have connected two more racks to the pod and are using the core switches as a spine:

image 3- pod2.jpg
This tutorial is an excerpt from "Building Modern Networks" by Steven Noble and published by Packt. Use the code ORNCD09 at checkout to get the ebook for just $9 until May 31.
About the Author
You May Also Like


