SUBSCRIBE TO OUR NEWSLETTER
Stay informed! Sign up to get expert advice and insight delivered direct to your inbox
Here's everything you need to know about those annoying little cage nuts you wrestle with when filling a server rack. Learn how they're different from clip nuts, and get installation and removal tips.
July 15, 2014

I can't believe I'm writing about one of the simplest, most prosaic items in every data center: the cage nut. Everyone who's ever populated a server rack has had some contact with the cage nut, but it's rare I meet someone who groks the cage nut to fullness.
Having mastered the toenail clipper of death and MacGyvered a cage nut insertion tool from a PCI slot cover, I thought I was up on my cage-nut lore. But it was only when I researched for this blog post that I discovered just how much there is to know about the lowly cage nut.
In the beginning, relay and telecom racks were tapped; to mount a router or patch panel, you just put the right-size screw in the holes that line up. Here, children, is where the problem begins. Did the ancient telecommunications industry settle on a single screw size back when that was a possibility? No, it didn't. So while telecom racks are tapped, you can never predict whether any given rack is tapped in 10/32 or the slightly thicker 12/24.
In recent years, data centers have standardized on server cabinets (enclosed racks with mounting rails front and rear) with 3/8" square holes, rather than the pre-tapped holes of the past. Square holes have enabled server and storage vendors to use rails that latch into the rack, which are both stronger and easier to install than bolt-in rails. Since the square holes can just be punched into the rack rails, the manufacturers can save the cost of tapping all those holes.
Much as square-hole racks make it easier to mount rails designed specifically for them, a lot of smaller gear like network switches and even SuperMicro mini servers don't have dedicated rails -- just ears that bolt to the front rack rail for support. To accommodate this gear, we clip nuts into the square holes.
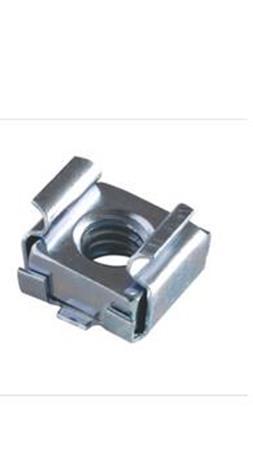
Cage nuts vs. clip nuts
Because having just one standard size or type of nut to clip in would make too much sense, we get to choose between clip nuts that clip around the rail and the more common cage nuts, which clip in from the back side of the rail.
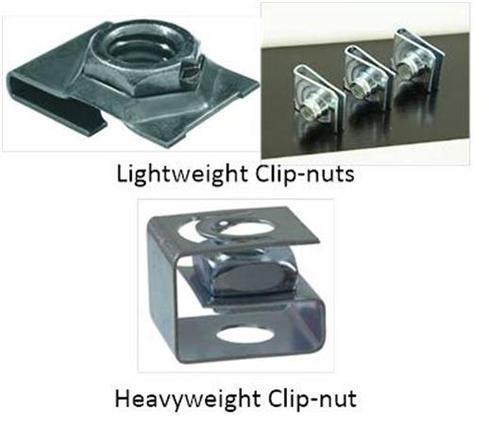
In general, clip nuts are somewhat easier to install without tools. The lightweight types slide on pretty easily, but I've seen them shift under the weight of heavy gear so that the bolt rests on the bottom of the cabinet's square hole. The heavyweight types might be the best for heavy kit, since the actual nut is held in place within the square hole of the rack rail by the spring and the tension of the bolt itself in the hole.
The problem with the heavyweight clip nuts is that it's damned near impossible to remove one without destroying it. You have to push the nut back out through the rail's hole, slide a knife under the little tab on the front side that holds it in place, and then slide it off. Since the lab is a dynamic place, I might need to install some tool-less rails in a slot where I last used nuts. Once I figured out the tricks to installing and removing cage nuts, I banned clip nuts from the lab.
Next page: All about bolts
As Adam Osborne once famously said, "The nice thing about standards is that there are so many of them," and so it is with the nuts and bolts we use in the data center. Cage nuts come tapped for four different sizes of bolts: The English 10-32 and 12-24 and the metric M5 and M6. While 10-32 and M5 are close enough that you might be able to force an M5 bolt into a 10-32 nut, the others just won't fit.
My first recommendation to you, dear reader, is to standardize your data center on one and only one size bolt and cage nut. Like most of us, you'll accumulate some cage nuts and bolts in the data center; many vendors provide several sizes with their equipment. Resist the temptation to save a few dollars by saving them all and using whatever's handy. Cage nuts and bolts are cheap enough ($30/100 for cage nuts at Amazon.com) that buying a standard size is cheaper than the time and aggravation of hunting for an M5 screw in a coffee can of mixed screws.
If your network closets have two-post racks tapped 10-32, you should do the same. Similarly, if your network guys bought 12-24 racks, you should use that size and live with their gloating. If you made the mistake of buying two-post racks without specifying the threads, and you have racks with both 12-24 and 10-32 or mixed English and metric, the best you can do is label the racks and the containers where you keep your bolts to reduce confusion.
DeepStorage labs is standardized on 10-32 for several reasons. Though we don't have any two-post racks, we do have a Star Case rack that's tapped on the sides 10-32, and since I spent years working with AV gear and racks tapped for 10-32, it just feels right to me.
Choosing bolts
One advantage of using 10-32 or 12-24 English threading is that, in a pinch, I can run down to the local hardware store or Home Depot and pick up extra bolts. Readers outside the US should standardize on M5 or M6 hardware for the same reason.
You can use any old 10-32 bolt to hold your gear in the rack, but they're not all the same. When you're holding a network switch or patch panel over your head with one hand and bolting it in with the other, little things matter. Large heads are less likely to slip through the slots on rack mount ears and have more surface area to spread the force over that thin sheet metal. The most common screws at the big box stores have round heads, but the best screws for use in the data center have the larger pan head.
Cage nuts are loosely mounted in their spring clips to prevent minor alignment mismatches from jamming up the works. Though this is generally a good thing, it makes it easier to cross thread a bolt into the cage nut.

Dog-point bolts (screw detail pictured right) that have a short unthreaded section at the tip make it easier to find the cage nut and start the threads when you're working in blind or awkward positions like u1 at the bottom or u42 at the top.

The perfect rack screw, like the one pictured to the left, has a big head and the dog point to make it easier to insert and, more importantly, to prevent cross treading that can damage the screw or the nut. Plastic washers prevent the screws from scratching your equipment; I've never cared about scratches on my rack mounting ears, so I leave them off.
Of course, having made my decision years ago to stick to 10-32, the cabinets our friends at CommScope were so kind as to provide for the new lab each came with 100 M6 cage nuts and bolts. They'll soon be listed on eBay.
Next page: Installing cage nuts
The problem most folks have with cage nuts is that no one ever showed them how to install them properly.
I think I’ve seen most of the mistakes people can make with cage nuts, though I learned long ago never to say I've seen it all, as someone will come up with an even worse idea than the ones you've seen.
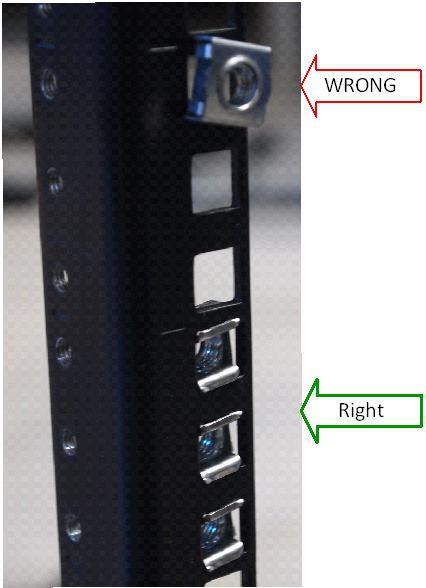
The biggest mistake you can make is mounting the cage nuts on the front side of the rails.
If the nut is on the front of the rails, the weight of the gear that nut is supporting is borne by the spring tabs, not the nut and bolt themselves. If that gear starts to pull the nut out at all, the top clip will come out, and the gear will fall out of the rack to the floor.
With the nut on the back of the rail, the tension of the bolt itself pulls the nut into the rail hole, making a much more secure connection.
Then we come to the great horizontal vs vertical debate. Though I've been unable to find a definitive best practice on the Internet, each approach has its advantages; I'll switch back and forth as the situation requires.
The horizontal mounting model -- which places the spring tabs of the cage nut on the sides, not the top and bottom, of the square hole -- has the advantage of easier access when installing and, more importantly, removing the cage nuts, since you only need access to the sides.
The problem with the horizontal method is that the cage around the nuts is frequently too big to allow nuts to squeeze into all three holes of a rack unit. At least for the cage nuts we have around the lab, the tabs that hold the nut into the rails stick out a bit less than the ones that hold the nut into the cage, so vertical mounting works better for rack units that need all three.
Everything's easier with the right tools
I can't count the number of times I've walked into a client's data center and seen their folks installing and removing cage nuts with their bare hands. Think about it. The spring that holds that cage nut in the rack has to hold around 50 pounds; squeezing it in takes a significant amount of force. Add in that the cage around the nut can be sharp, and cage nuts end up being a continuing source of minor injuries.
The funny part is that most of them have one or more cage nut insertion tools, but they've never been shown how to use them. Most server cabinets come with an insertion tool that looks like someone bent the blanking plate for a PC expansion slot.
Unfortunately, many of these little gems get lost or thrown out. I keep them hanging on a hook in the lab and have even bent and filed down a PC slot blanking plate when needed in a pinch. You can buy a fancier one with a plastic grip from Server Racks Online for $15, or you can find them in combos with cage nuts and screws on Amazon.
Figure 5: 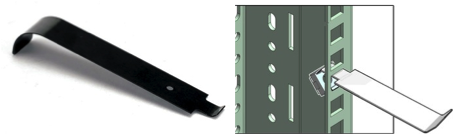
Installing a cage nut with the insertion tool is a snap -- just stick the cage nut in the hole, hooking one of the cage nut's tabs into the rail. Then stick the skinny end of tool through the hole along the opposite edge, with the hook facing in. Grab the inside edge of the spring clip with the hook, and pull as shown above. Viola, the cage nut is installed -- and no busted knuckles, cuts, or dented thumbs.
Next page: Removing cage nuts
I usually just leave the old cage nuts in place when removing equipment, but they do occasionally get in the way and have to be removed. Until recently, I just used a flat blade screwdriver to press the clip off one side, which caused the nut to spring off into the bowels of the cabinet with the dust bunnies.
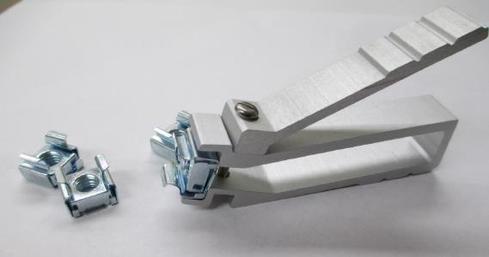
More recently, I discovered a tool I've dubbed "the toenail clipper of death" that makes removing the nuts much easier. As you can see from the photo, it slips over the back of the cage nut and squeezes the tabs on the nut closed just enough that you can lever it out of its hole pretty easily. You do have to fiddle a little with the adjustment screw to get the jaws to close enough to get a nut out of your rack.
Some folks pitch the toenail clipper of death as an insertion tool, too, but I find the hook type lets me get the batch of cage nuts for a given device in faster. I highly recommend the $19 cage nut removal tool at stayonline.com.
While the wand chooses the wizard, the wise geek spends a few extra minutes to choose his cage nuts -- and the tools he uses to install them -- carefully.