One task a network engineer filling the role of a voice engineer often finds challenging is the configuration of a PLAR phone. PLAR stands for Private Line Automatic Ringdown, which is used to take a phone's handset off hook and have that phone autodial a number. Phones with this functionality go by many names, including bat phones, ring-down phones, and hot-dial phones.
Most often used in elevators, courtesy booths, security stations, and public lobbies, these phones are a cinch to configure in Cisco Unified Call Manager (CUCM) once you know the process.
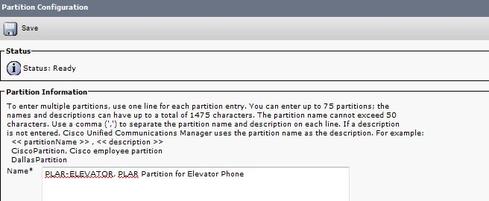
The first thing you need to do is to create a partition that will be the initial building block for your PLAR configuration. If you haven't created a partition in CUCM before, you simply navigate to Call Routing -> Class of Control -> Partition. Select Add New. Personally, I like to include PLAR in the name of the partition I am creating so that future administrators don't have to guess at what I was trying to accomplish.
Your new partition creation will look something like this:
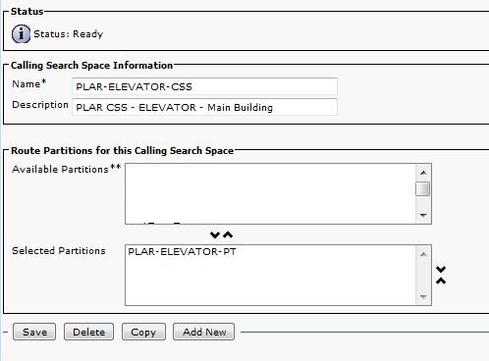
Once you have created this partition, you will need to create a Calling Search Space that will hold it.
Just hop on over to Call Routing -> Class of Control and this time select Calling Search Space. Select Add New. Now, calling Search Spaces (CSS) can get tricky -- just ask any voice engineer. On this PLAR CSS, you will need to add only the partition you just created; this assumes you do not want the phone in question to be able to dial any other number. Typically this is the case, but in voice there are always exceptions. If you want the ring-down phone to be able to call, for example, internal extensions as well, you should also add the partition(s) containing your internal directory numbers to this CSS as well.
Your newly created CSS will look something like this:
The next step is creating the translation pattern that fuses these elements together. The trick to PLAR magic is creating a translation pattern that translates nothing into something. To do this, navigate to Call Routing -> Translation Pattern -> Add New. You will want to create the translation pattern, leaving the translation pattern field blank on the creation page. This is the "nothing" part of the equation.
The next important items on your translation pattern creation page are the Partition and the CSS. The partition you select will be the partition you just created at the beginning. The CSS, however, will be a calling search space containing the partition that your destination number is in. Usually this destination number is internal, so use a CSS that contains the internal partition. To verify, check your CUCM for the partition of the destination number, then confirm that your chosen CSS has this partition in it. This is also an excellent troubleshooting step, should you find your PLAR phone isn't working properly.
Also on the Translation Pattern creation page, you will need to add your destination number to the Called Party Transform Mask field.
Pictured below is a completed example of the Translation Pattern Configuration screen that assumes your off-hook destination is directory number 9999:
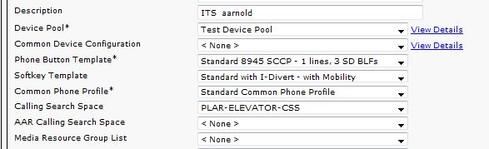
At this point, there's just one last configuration hurdle to jump through: the endpoint configuration. The device needs the PLAR Calling Search Space assigned to it. This may be a VoIP phone, but it could also be an analog phone attached via an MGCP/SCCP gateway or an analog phone attached via an ATA. These devices require the same process: changing the Calling Search Space on the device to the PLAR CSS you created and then resetting the device.
Here is an example of setting the Calling Search Space on a device:
Devices attached via an FXS port on an h.323 controlled gateway will have a slightly different configuration process for PLAR. They don't use the partition, CSS, or translation pattern you created, but instead you add a PLAR statement directly on the voice port. Here is an example of an h.323 FXS port configuration:
voice-port 0/0/3
connection plar 9999
description Elevator Phone
After this, you will need to ensure there is a dial-peer that will send the call to your CUCM. Something like this would do the trick:
dial-peer voice 9999 voip
description Elevator Phone PLAR -- send call to CUCM
destination-pattern 9999
session target ipv4:10.10.10.10
dtmf-relay h245-alphanumeric
codec g711ulaw
fax rate disable
Now that you've got all your configuration pieces in place, you can rest comfortably knowing that Commissioner Gordon's bat phone is working and Gotham is all set for the next emergency call.