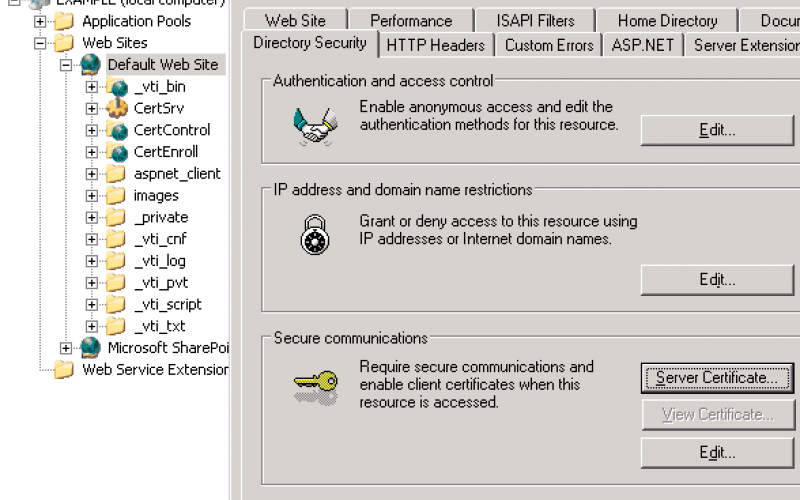
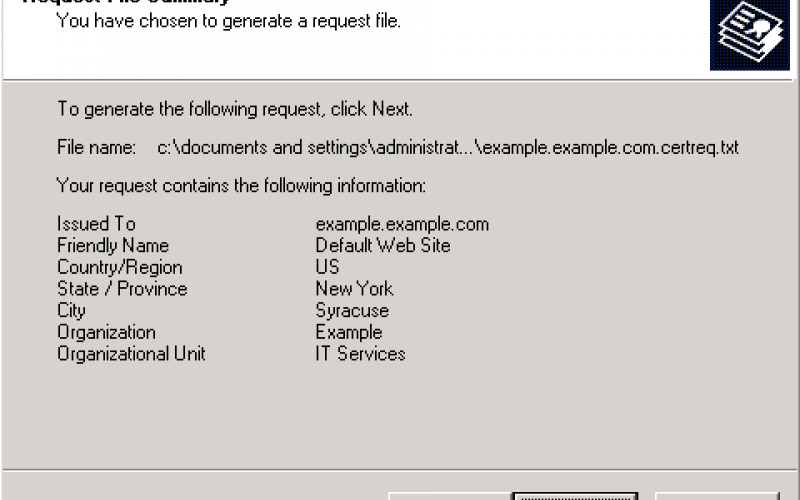
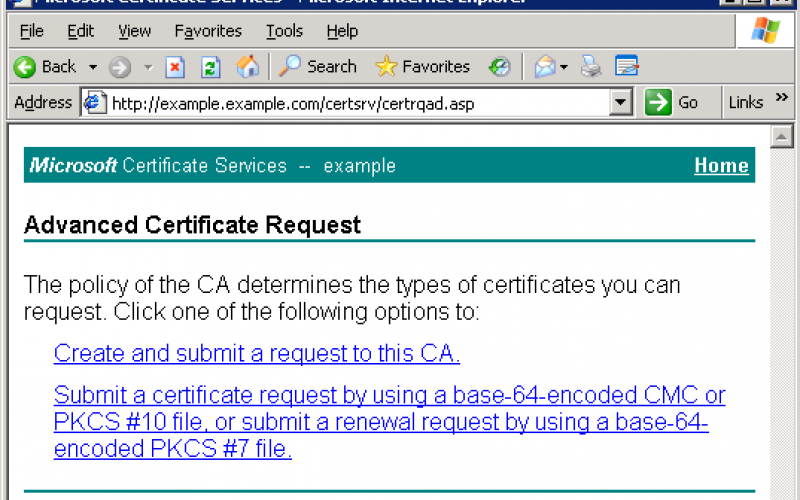
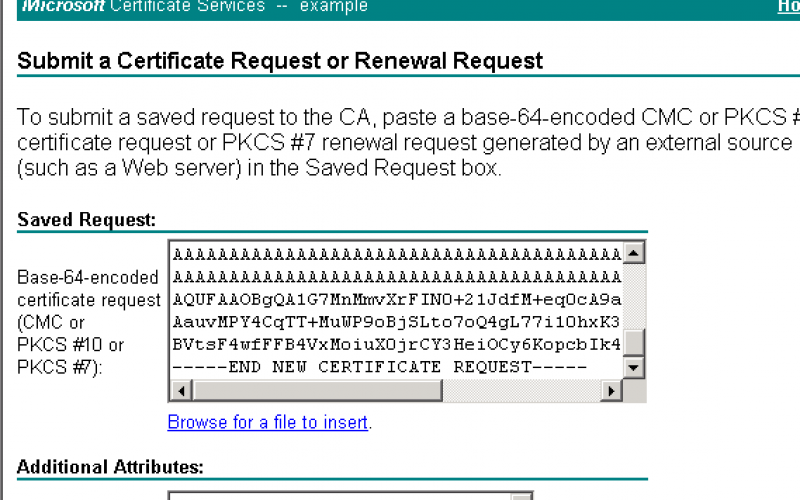
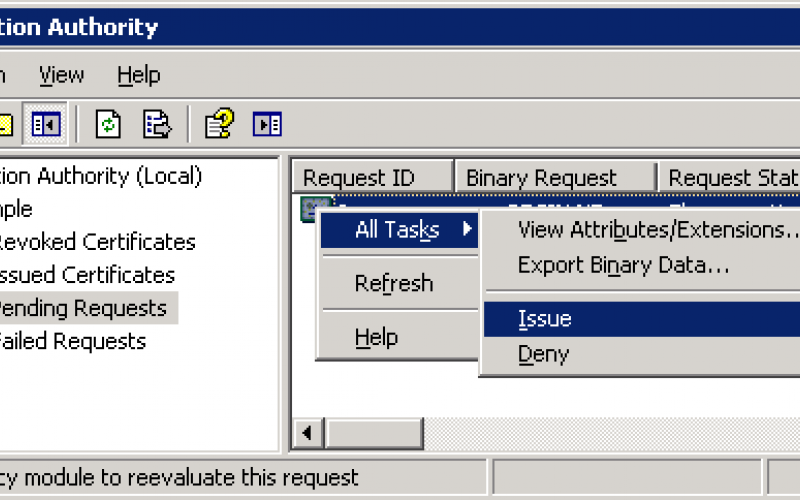
Network Computing is part of the Informa Tech Division of Informa PLC

This site is operated by a business or businesses owned by Informa PLC and all copyright resides with them. Informa PLC's registered office is 5 Howick Place, London SW1P 1WG. Registered in England and Wales. Number 8860726.

How To Set Up A Certificate Authority In 10 Minutes


  • The CA we are going to build is aimed solely at IT shops that need a CA but don't want to roll out an enterprise wide CA. Having an enterprise CA tied to Windows Active Directory is quite handy and Microsoft makes it pretty easy to install and manage. If your organization doesn't have a CA or you want one that you can manage yourself, follow along. Microsoft also has extensive documentation if you want to dig in deeper.

    If you want to install a CA tied to Active Directory, stop reading this and go read Microsoft's documentation. You'll thank me later.

    Note that I did skip simple steps like clicking next or taking the defaults. When in doubt, just click next. What can go wrong?

    On Windows Server 2003 (I don't imagine this is any different in Windows Server 2008), go to Add/Remove programs->Add/Remove Windows Components and select Certificate Services. Select a stand-alone root CA. That will give you a CA independent of Active Directory.


  • I took the advanced path to show the options. The defaults are OK. Unless you are using an alternate cryptographic provider, just use Microsoft's. It does the hard work. Make sure you pick SHA-1 and a key length of 2048. The hash algorithm is what is used to sign certificates and the key length is for the public/private key length.

  • Enter a name of the CA. This will be used to identify the CA to others, so pick a meaningful name. Also, pick a reasonable validity period and remember to mark when it will expire because you will need to renew it prior to that.

    Just take the defaults for the rest of the steps. When you finish, Windows will install certificate services, the MMC console, and configure IIS (make sure it is already installed). If you haven't installed Active Server Pages, it will ask to install and enable them. Say yes. You now have a shiny new CA.


  • If you point your browser to https://<host name>/certserv (in my case https://example.example.com/certserv), you will get an error because we haven't installed a certificate nor enabled SSL on that website. The installation only puts the certificate pages on the site. We don't want that, so let's enable SSL. By the way, the steps from here on out are similar to what you will do when creating certificates for your IT appliances. Bonus.

    We need to generate a certificate request. To do so, we'll open IIS Manager and find the website we are working with. In my case, the Default Web Site. Right click on the site and select Properties->Server Certificate->Create a new certificate

    Creating a meaningful name. It's only used by you. Next set your organization (usually your company name) and Organizational Unit (your department). You can enter anything, but a meaningful name will be helpful.


  • Set the common name. For a SSL/TLS certificate, this must match the DNS name of the target site or you will get an error when you try to access the site because the SSL client should compare the DNS name entered in the browser against the common name in the certificate. You can use wildcard DNS names that match any hostname within a domain, but it's generally a bad practice unless you have a compelling reason. Let's not go there.

    Fill in the country, state, and city fields. Just enter what ever is meaningful to you. It doesn't technically matter. Pick a file name and location to save your certificate request.


  • Review the request. You can see the informational fields in the request. The only critical field is Issued to: That is the common name in the previous step. Just click through the defaults.

    The IIS Manager will create a public/private key pair; create the certificate request adding the public key to it, and sign it with the corresponding private key. The private key never leaves the IIS server at this point although you can export it later.


  • Now we are going to submit the request to the CA for signing. We are doing this ourselves, so it seems like a lot of steps, but you can assign people tasks such as reviewing and approving requests. Go to your certificate servers web page, by default http://<hostname>/certserv

    Select Request a Certificate->advanced certificate request->"Submit a certificate request by using a base-64-encoded CMC or PKCS #10 file, or submit a renewal request by using a base-64-encoded PKCS #7 file."

    We are going to submit our request here. You can also create a certificate request by filling in the fields, but in most cases, you will generate the request on the device and submit that to the CA.


  • Open the certificate request you created in notepad or some other ASCII editor. Select all of the text making sure you include -----BEGIN NEW CERTIFICATE REQUEST----- and -----END NEW CERTIFICATE REQUEST-----. This is a signed, base64 encoded file. If you open it in a non-ASCII editor the characters could get munged. If you don't get the begin and end lines, the CA won't process it. Click submit.

  • Go to Certificate Authority under Administrative Tools. Microsoft's certificate manager is pretty bare bones. You can look at certificates, but finding them when you have hundreds or thousands is difficult, but we'll soldier on. Luckily we won't spend a lot of time in the MMC.

    To find your current certificate request, go to Pending Certificates. Locate the request. You can review the data submitted (not shown due to format constraints) by scrolling side to side and if you right click, you can issue the certificate or deny the request. Click issue.


  • Click Issued Certificates and find the certificate you just issued. Right click and select Details and you can view the certificate or save it to a file. If you save it do a file, save it as a Base-64 encoded X.509 (.CER) file and give it a name. This is the most common format. Your appliance may require a DER encoded file, so you have that option as well.

    See the information in the lower window? That's what I mean by meaningful. If I had devices all over the place, I could easily see the locations from the certificates.